
The definitive guide for Revit commands

For every operation you perform in Revit, there’s a keyboard shortcut that can help you do it faster.Here’s a rundown of some of my favorite Revit keyboard shortcuts for creating and organizing your model. Read on to learn how to create your own.
Create and modify elements
CS – When the element is selected, a new similar element is created
DL – Create detail lines
DR – Create door
M + Space – Match properties
MV – Mover
UP – Remove pin
RM – Create Room
RT – Insert Room Label
SL – Split element
Select elements
Arrow Keys – Nudges the selected item
Shift + Arrow – Moves the selected item 10x.
CTRL – Select multiple items
MD – Activate the Modify tool
TAB – Move forward through multiple overlapping elements
SHIFT + TAB – Reverses the order of the TAB path
Views
HI – Isolate element
HH – Hide element
HC – Hide category
SD – Shading with edges
TL – Fine lines
VV – Visibility / Graphics dialog for the current view
WF – Wire frame
ZE – Zoom to fit
SHIFT + Middle Click – Orbit in 3D views or pan in 2D views. Selecting an object before pressing SHIFT + Middle Click will cause the orbit to rotate around the selected object.
File operations
CTRL + O – Open new file
CTRL + N – Create new project file
CTRL + S – Save current file
Several
ALT – Activates keyboard shortcuts for all interface elements. This can be useful if the mouse freezes before you can save the file.
Create your own Revit commands
You can easily program your own Revit keyboard shortcuts. To do so, go to View > User Interface > Keyboard Shortcuts or type “KS.”
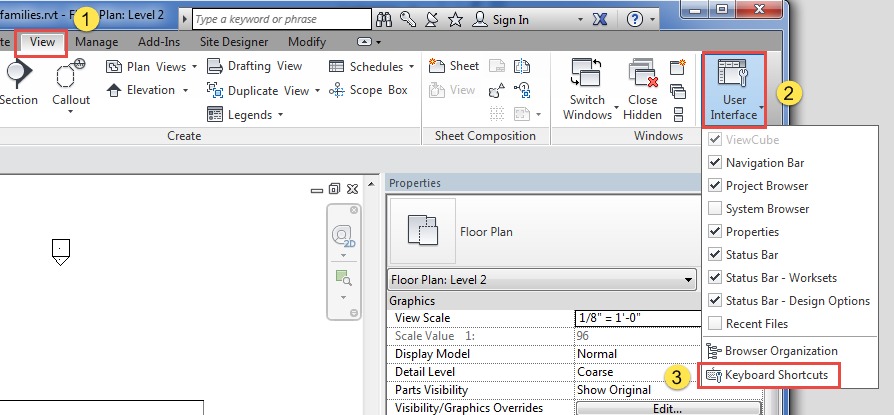
This will open the keyboard commands dialog box.
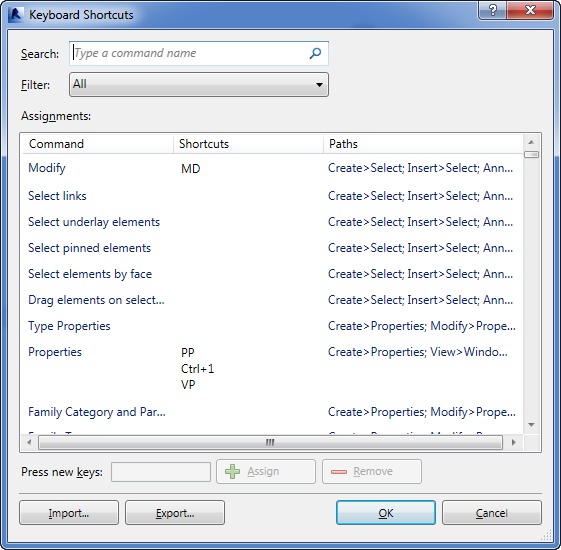
All default keyboard shortcuts are displayed. Any shortcut listed in gray is a system shortcut and cannot be changed. To add a shortcut, search for the command in the “Command” column or type the command name in the “Search” field. Once you’ve selected the command, enter the shortcut combination in the “Press new keys” text box and then click the “Assign” button.
You have a lot of flexibility when assigning shortcuts. A single command can have multiple shortcuts. Similarly, a single shortcut can be used in multiple commands. In this case, use the arrow keys to cycle through the commands as shown in the status bar. Once you have the command you want, press the space bar to execute it.Some custom shortcuts you might consider are:33 – Default 3D ViewAA – Activate viewDD – Disable viewJJ – Join geometryML – Manage Links
MM – Macro managerSAV – Select all instances in the viewSAS – Select all project instances
WS – WorksetsWW – Create wallsWant more suggestions? Check out this discussion on LinkedIn.
Naming your commandsSpeed is king when it comes to naming your shortcuts. Consider defining your commands using the same letter or letters located very close together on the keyboard. JJ for Join Geometry or AA for Activate View are two good examples.You can even create three- or four-letter shortcuts if you have similar names. You can define WW for Create Wall and WWW for Worksets.This method minimizes the amount of hunting and pecking required to find shortcuts. And it allows you to keep one hand on the keyboard and the other on the mouse.
Source: https://www.plataformaarquitectura.cl/cl/804747/la-guia-ideal-para-los-comandos-de-revit Like Share (0)


